Wednesday, 26 September 2012
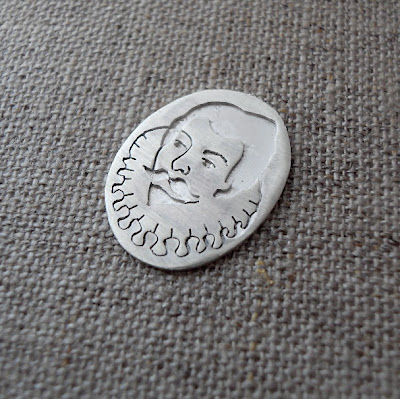
Sketching in Silver Sir Walter Raleigh finished pendant
A few photos of the finished pendant:
I quite like the hammered oval frame. I soldered it on using pallion soldering so that everything is secure.
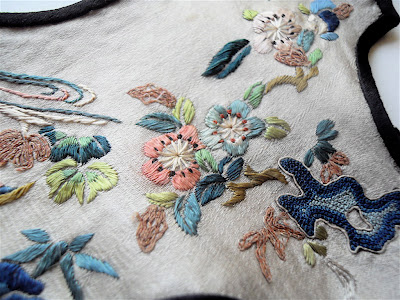
Vintage Embroidered Chinese Cloud Collar
I just wanted to share with you this beautiful collar that I saw at a vintage market a few years ago. I really don't know much about the provenance but the seller said that she was given it by her friend in Singapore in the 1970s. I love that each little character has a personality and the embroidery is beautifully done. There is quite a lot of water damage on the silk so it needs a little TLC. I did a little bit of research and apparently this type of collar is called a Cloud Collar because of its distinctive shape and was often worn at wedding ceremonies.
This is my favourite character:
This is my favourite character:
Tuesday, 25 September 2012
Sketching In Silver Series Update: Soldering
This post is an update of my Sketching In Silver: Portraits series, which has been at the top of my to do list for some time. The idea is to pierce a portrait of an historical individual using well known British portraits for inspiration, then solder some silver sheet onto the back to strengthen the pierced design.
It did work the first time that I tried it with my portrait of Elizabeth I
However, since then I've had a few expensive disasters that are frustrating and disheartening when the solder ran and obscured the pierced design as you can see from poor Anne Boleyn below
Now, it's a poor workman (or woman) who blames his (or her!) tools but I do think that the technique of pallion soldering that I was using was incorrect for this type of work. Pallion soldering is when you cut up tiny pieces of solder and melt them using a butane torch on a fire brick. Anyway, after some serious contemplation, I alighted on the idea of using silver solder paste. My reasoning was that the solder is powdered and combined with flux in a syringe so it should melt quicker and stop the silver from getting too hot and melting or the solder from running too freely. A bit more research and I decided to use hard solder paste (there are several types of solder: hard, medium, easy and extra easy where hard is the most commonly used.)
Last night I had a go at making a Walter Raleigh pendant and apart from the extremely noxious fumes that the solder paste produced (seriously this should most definitely be used in a well ventilated area and if you possibly can, outside!) by jove I think I've got it!
The design seems securely soldered onto the sheet at the back and as you can see, the solder hasn't run and engulfed the design as before.
The original portrait miniature that this image is based on is by Nicholas Hilliard and it is part of the National Portrait Gallery's collection. It is unfortunately not currently on display.
Now I just have to decide what design to use as a frame and then solder on some links to attach the beads that I want to use. Of course it could still go very wrong when I solder the frame on but fingers crossed all will turn out well!
Monday, 10 September 2012
How to Make a Fire Demon: Part Two
I decided to make my little silver Calcifer into an earring so I soldered an earring post onto the back of the silver shape.
After filing, sanding and polishing him using a barrel polisher, he was very shiny indeed and I used Liver of Sulphur to oxidize the tiny dots in his eyes. It is a liquid which bled a little around the edges that I wanted to keep silver so I then used a very sharp scribe to scratch at the surface around the black pupil of the eye to keep the oxidized part to that small raised area.
Another quick polish and he was ready to wear!
Sunday, 9 September 2012
How to Make a Fire Demon Earring: Part One
Using my new jewellery making set, I decided to experiment and see what effects I could get from stamping the various tools onto 0.5 mm silver. You pass the steel rod through the opening at the top of the metal stamper. Pre-heat the metal to make it more malleable and cool it by plunging it in cold water. Then, position the stamp over the silver sheet and give it a whack with a hammer (I used a 16oz hammer, which is pretty heavy with a long handle so that it would make a decent impression!)
The effect of having a tiny raised dot and compressed outer ring looked like an eye to me and as I have been watching my Studio Ghibli dvds again recently, I thought it was a perfect excuse to make a little Calcifer fire demon from Howl's Moving Castle!
I cut around the eyes free hand to make the flame ball shape and drilled a small hole for the mouth, passing a saw blade through to make the smile shape.
To be continued...
Friday, 7 September 2012
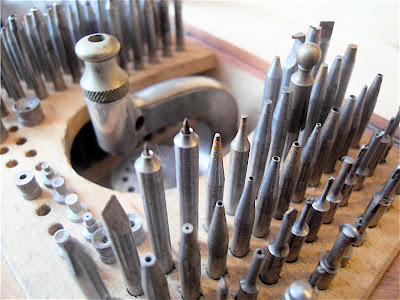
Vintage Jewellery Making Set
The antiques market in the Jubilee Hall in Covent Garden is one of my favourite places to go on a Monday morning. It's got a fantastic array of jewellery, porcelain and the odd random knick knack all at very reasonable prices considering its central London location. I often find that there are those moments when you notice an item on a stall and are drawn towards it like a moth to the flame. The Monday just gone was one of those moments!
A humble red wooden box holds a wonderful array of watchmakers and jewellers tools. Stone setting implements, gravers and punches. Some of the tools are a mystery to me but I knew enough about them to know that I had to have them!
The label on the front of the box reads Robert Pringle and Co. The company was formed in 1835. They ceased trading in 1965 so this is at least 47 years old!
Judging by the wear on the box, it has been well used although some of the tools are a little bit rusty. I wonder who used them in the past. Perhaps it was by an apprentice although the tools are so fine so they must have been used by someone with a steady hand and a lot of skill.
I have used similar tools before so I can't wait to get to work on some silver with these!
Wednesday, 5 September 2012
Subscribe to:
Posts (Atom)


